Showing posts with label DIY. Show all posts

Wednesday, June 20, 2012

Life on a Silver Platter - My Upcycled Chalkboard Platter

After seeing something similar in a Pottery Barn catalog well over a year ago, I have been biding my time and keeping my eyes open while at thrift stores, flea markets and garage sales for the perfect platter.  I found this lovely large silver plated platter at North Country Neighbors in downtown Potsdam   for only $10!

The platter was tarnished when I got it, but all it took was a little elbow grease with a polishing cloth and now it shines!  All I did was paint a layer of white paint as a base in the center of the platter and then 3 layers of chalkboard paint.  Then I glued a long piece of beautiful red rose scrap fabric, with super strong permanent glue and as of this morning it was still hanging on the wall!


It is hanging right next to my dining room table and will be a wonderful place to highlight holiday/birthday messages!  

I love it so much I may have to head back and pick up one of the smaller platters to make another!


Wednesday, March 7, 2012

DIY Giant Whimsical Paper Flowers

I am not sure if I mentioned this in my previous blogs, but I am maid of honor in 2 weddings this spring and I have truly enjoyed being able to put my crafty side to work creating again.  Not that I don't enjoy bed springs and recycling, but sometimes you just need to do something different.

I originally found this tutorial on Pinterest, the pin was from the Design Sponge website but the flowers were created by Ruche.  Which if you are in love with all things vintage and have never been to Ruche, check it out they have beautiful clothes and decorative items. It is one of my favs!

Anyways so I followed the tutorial, but have a few notes on how I altered it for my creations.

1.  When you are filling your cups with the cement make sure you have at least 3/4 of a cup, this will make them strong enough to hold up taller flowers.  My current ones are about 1/2 a cup and definitely won't hold flowers any taller than the ones I'm showing (about 4' tall).   I had to have a quick lesson from the BF in how to use quickcrete and strongly suggest before putting any cement powder in your cups add a tiny bit of water to the bottom, it definitely helps in the mixing process.

2.  Instead of using stucco corner, I used chicken wire, which we had out in the barn (so I guess this is an element of recycling)  It worked great and I didn't have to wire it closed I just bent it to the stem shape and taped it with masking tape.

3.  Lastly, my flower tops are different b/c I attempt to make one like theirs and failed!  Well not completely, but I didn't like the end result.   It is very difficult to tape the flowers together b/c tape and tissue paper do not work well together.  If it sticks, it rips!  So I decided to use five sheets of tissue paper and create blossoms like I used in my phone book flowers.  So much easier and created giant blooms!  I also made the wire "stem" of my flower long enough that I just stick it in the large chicken wire stem and cover it, no zip ties needed.

4.  For my centers, I took a darker purple tissue paper and cut it up with my fringe scissors, sprayed the centers with spray glue and dropped it on!  Spray glue may also be a good option for glueing the green tissue paper to the masking tape, as using plain white glue is very time consuming.

The finished result:


They remind me of the giant singing flowers from Alice in Wonderland, while the BF says the remind him of the flowers that come up through the pipes on Super Mario.  Either way excellent bridal shower, wedding or even to decorate your little girl's room!

Enjoy!

Friday, October 14, 2011

The UGG Boot Dying Project - Trial 1

Everyone who lives through the salty North Country winters knows it reeks havoc on Ugg boots.  My brown pair, which are going on 3 years old and still in great shape other than the lighter spots on the toes from the salt.  I would consider this first trial semi-successfully my Uggs are a little darker, but still not what I want them to be, so I will have a Trial 2 to post later.  

My Uggs before:


Step 1:  Soak your Uggs with Hot Water
Step 2:  Fill a large bucket with hot water (I did this in the tub and then brought it outside to prevent a mess)
Step 3:  Add bottle of dye and stir with a stick to mix in and then add your uggs (you may have to like wedge them down with something to make sure they stay all in the dye)
Step 4: Let soak for 30 - 40 minutes
Step 5: Rinse (This is where I think I went wrong, I rinsed mine immediately with cold water from the hose and I think I should have down it in the sink with hot water then going gradually to cool, I am going to try this  in Trial 2)
Step 6.  I stuffed my Uggs with newspaper to keep them standing up and to help them dry, they will take several days to dry.  

The finished product: (ignore the grass)


They dont' look too much darker in the picture but to the eye they are a shade darker.  I will be trying this again though so watch for my results from Trial 2!

Thursday, October 6, 2011

Creepy Bloody Recycled Jar Lanterns

 I love Halloween and all things scary.  I have been working on decorations for the BF and my upcoming Halloween party and here is a great one I came up with.  This is super easy and I think really really scary.


Basically, I took a bottle of white elmer's glue and add a few knife tips of the red gel food coloring (found in the cake decorating stuff).  I did an entire bottle b/c I'm making a bunch of these, you could also mix it in smaller batches.  Stirred it around with a wooden skewer and took my clean recycled jar, placed it on wax paper.  Took the glue bottle, with my now red glue and filled just the threaded rim of the jar with glue and let it drip down the jar.  Let it dry and it will have a nice bloody look!


Wednesday, October 5, 2011

Wedding Wednesdays: Colorful Ruffled Crepe Paper Tutorial

I found a tutorial a long time ago on how to make this, but I couldn't find it again to link to so I made my own.  Ruffled crepe paper is a cheap and super easy decoration alternative.  I made a bunch of it last fall for the BF's Grandmas 80th birthday party and it was a hit.  It looks 10x nicer than plain crepe paper.  I wish I had taken photos of it from her party, but unfortunately as normal I forgot.


Step 1:  Choose your colors!  These could be your wedding colors or accent colors.  For this tutorial I chose lime green and fuschia.  You can also use three colors and just cut it into long strips and inter mix the three, a little more challenging but that is how I did the red, yellow and orange combo above.


Step 2: Get out your sewing machine! Using a basic straight stitch, layer your crepe paper one over top of the other.

\

Step 3: As you are sewing along, gently give the crepe paper a little push so that it folds a bit and sew over the fold.  This will leave a nice ruffle, kind of messy ruffle!


Step 4:  Keep sewing until you get your desired amount, it really isn't a labor intensive process just tedious!  If you know how long you need your streamers to be for decorating I would pre-measure and cut strips of the crepe paper to sew, just make sure you add a little extra to cover the ruffling.


There are so many uses for this beyond just streamers, it could be tied to chairs or laid on a table as a fun runner.  I have even used it to decorate gift packages!

Enjoy!

Wednesday, September 28, 2011

Wedding Wednesdays: Musical Love Banner

So last week I posted about how to make your own wood mounted stamps.  I finally got all my letters finished which I would say total in only took me about an hour to cut them all out.  I had all the blocks pre-cut and then i just had to stick them on.  They are working out great, check out what I made with them this week:


Stamped on triangles cut out of old sheet music.  It would be perfect at a rustic wedding!


Here are the stamps I used!  Only problem I've found is I need to make sure I am stamping on a flat level surface to get an even amount of ink on the stamp and then an even imprint on the paper.


For this banner, to make it a little heavier I cut out the same size triangles from a cereal box and glued them to the letters.  Using a whole punch, I punched holes evenly across the top through both the paper and cereal box layers and then threaded through a red gingham ribbon.  I got the entire roll of red gingham ribbon for 50 cents at the flea market


If you were planning on hanging this banner somewhere the back would show as well, you could easily cut sheet music out and put it on the back.  You could even re-stamp something on the back of it as well, so it would be 2 sided :).

Happy Stamping!

Monday, September 26, 2011

Recycled Jar Homemade Air Freshener

Another great Pinterest find, created using any jar with a lid.  I made two of these this past weekend.  One for the kitchen with refreshing eucalyptus oil and another for the bathroom with lavendar oil.

Photo Credit: The Complete Guide to Imperfect Homemaking

Supplies: 
Any jar with a lid (doesn't have to be glass, can be plastic)
Baking Soda
Your Favorite Essential Oil
Hammer and a Nail 

Instructions: 
Fill the jar 1/4 full of baking soda and then add 6-8 drops of your favorite essential oil.  Put on the lid, give the jar a little shake to mix together the oil and baking soda.  Punch holes in the lid with the hammer and nail.  

To refresh the scent I just give my jars a little shake when I am near them.  They work great!  Feel free to also jazz up your jar a little bit with some ribbon or scrapbook paper to make it more decorative.  

I am going to make one for my desk at work with peppermint oil!


Thursday, September 22, 2011

DIY Wood Mounted Stamp Tutorial

I have been trying to figure out how to make my own stamps for a long time.  There have been several trial and error versions.  I have done several of the carving type, similar to block printing which work well but are way to time consuming for me to make.  I created this "Wicked" Banner with stamps I created and mounted myself. Check it out:


Here are my stamps!  They look so professional :)


Large rubber stamps are hard to find and also expensive, so to be able to make your own is incredible. 

And here is the tutorial: 

Supplies: 
1. A print off on regular paper of the letters (or shapes) you would like to make into stamps.
2. Stencil (Sign) Tape (it is about an 1/8 inch thick rubbery material, mine was given to me for free, but I think I found it on dickblick.com)
3.  Wood blocks bigger than the stencil.  The BF cut mine up for me out of a planed pine board and they are a perfect weight.
4.  Glue Stick
5.  Scissors
6.  Exacto Knife (Optional)
7.  Cutting Matt (Optional)
9.  Ink Pads & A dog that won't leave you alone when you are playng with permanent ink!  I swear he almost ended up with orange paws (optional). P.S. I like StazOn ink pads they are pricey but work the best.

Instructions: 
Step 1 -
Here is my print out.  My letters are about 2.5 inches tall, printed on regular paper.


A close up of the stencil tape.  It has like a thin white paper backing that has adhesive to stick to the  actual stencil material.  You are going to want to have the paper side up, the stencil material down.

Cut out each of your letters.  I just squared them up as close to the edges as I could and using a little glue from the glue stick attach them to the stencil tape backing (the white paper side). 

 Step 2 -
Cut out each letter with scissors or if necessary the exacto knife and cutting pad.  For my letters I only needed the scissors but for more intricate stuff you may need the knife.  It should look something like this!


Step 3 -
Carefully peel off the paper backing leaving the adhesive backed stencil tape letter.  Stick it to the center of your wooden block. Adjust it wear necessary b/c the material is a little stretchy.  (All of mine have held fine, but down the road may need some glue).  Don't throw out the paper backing with the letter print out b/c you can use this to label your stamp :)

Sorry I was so excited to stamp I didn't take a photo before I did!

Step 4 -
Stamp Away!

I cut out pennants from an old book and stamped my letters on it.  I didn't press down too hard so that my letters have a distressed look.  Punch some holes and string it on ribbon or string and you have a easy banner!


Tuesday, August 2, 2011

Homemade Natural Laundry Detergent

Normally I use Tide.  I like it b/c my clothes/sheets always come out clean as well as soft.  But lately at Tide costing between $10 - $12 it just seemed a little outrageous.  I am such a scatter-brain all the time I normally forget to use coupons, so DIY stuff is a better option for me.  Honestly what can they put in detergent that would make it so much better than you can make yourself.  Through Pinterest I found a great DIY recipe for Laundry Soap, that I have been using for a few weeks now and notice very little difference.  My sheets are just as fresh smelling and soft as when I used Tide.


Instructions
Ingredients: 
1 cup of Borax
1 cup of Washing Soda
1 bar of soap (any kind)
Hand Grater

Step 1.  In a large bowl, using the small site of the grater, grate the entire bar of soap.   I should be fairly fine
Step 2.  To the bar of soap, add the borax and the washing soda. 
Step 3: Mix thoroughly.  I stirred mine for 3 - 5 minutes. 

I put my finished soap in an old blue Atlas canning jar with a tablespoon measuring spoon.  I use between 1 - 2 scoops per load depending on how large the load is.  I let the washer fill a little then add the soap and then let it continue to fill to make sure the soap dissolves well.  It won't be sudsy but it still cleans great!

1 box of borax and 1 box of washing soda will make several loads of detergent, for less than $10.  

The finished project:


Check back soon for my Homemade Dishwasher Soap!


Wednesday, July 13, 2011

Wedding Wednesdays: Guest Blogger Not so Crafty Jessica - Inexpensive & Easy Bachelorette Party Sashes!

Hi all! A couple weeks ago, I told Janessa that I was tasked with planning a bachelorette party for a family member and I was looking for a cheap, yet nice alternative to purchasing those “Bride” and “Bridesmaid” sashes that are often times worn on such occasions – and that unfortunately can run you around $8 a piece. Janessa, not surprisingly, offered me some advice on what I could do to save a little money and make some sashes that were personal, classy and a big hit with the ladies.
 
Now, I consider myself to be as far from crafty and creative as they come. So, the moral of this blog story is that if I can do this, anyone can! The wedding colors are black, white and red, so I chose to use this as my color palette along with silver for a little bling. The idea was to make the bride stand out, so her sash was black with silver and red embellishments while everyone else wore white sashes with red and black embellishments.

The items I needed were: 
Wide white & black ribbon
Thin silver ribbon
Fabric glue
Red, white, & silver puff paint
A package of scrapbooking embellishments (jewels, sparkly swirls)
Pencil
Scissors
Flexible measuring tape

I needed to make 10 sashes - Bride, Mother of the Groom, Mother of the Bride, Bridesmaids (5) and Flower Girls (2). Don’t worry, we didn’t bring the flower girls to the party, they just really wanted a sash. 

1. Use the measuring tape to figure out that a safe size for the sashes would be 6 feet. If you have someone who will be wearing a sash but is over a size 14 bottom, you may want to make this a bit longer. Cut the sashes. 
2. Put one sash around yourself or someone else to figure out where exactly you’ll want any writing to begin and end on each side of the sash. Use a pencil to lightly mark these spots. 
3. Use the space you have to write out the words in pencil on the front of the sash, like BRIDESMAID. 
4. Trace over the letters in puff paint and set aside to dry. 


After I finished the front of all of the bridal party’s sashes, I worked on the bride’s sash. First, I used fabric glue to secure the thin silver ribbon on both the top and bottom of the sash. Next, I followed the same steps as with the other sashes with the writing. Then, I added the silver embellishments wherever I thought they might look nice. I made sure not to put any on the shoulder area because scrapbooking materials are often rigid, so they won’t naturally bend with the shoulder. 


Once I finished the front of all the sashes, I decided just to quickly write everyone’s names on the back of the sashes. You can put whatever you’d like on the backs. 

When I got to the party, everyone loved the sashes and said that they would definitely keep them because they were so personalized and a great way to remember what a fun night we had! And the best part is that for all of these sashes, I only spent $22 and I had a lot of material left, so I could have easily made 6-8 more. That’s under $2 a sash!

Like I said before, if I can do this, so can you! So happy sash-making!

A Big Thanks to Jessica for providing her tutorial on sash-making for this week's Wedding Wednesday!  Hopefully she will have more to share!


Wednesday, March 2, 2011

Silhouette SD Giveaway on Sugar Pop Ribbons

I am extremely excited about this and would totally love one of these machines, if you do not know what it is or want more info visit Sugar Pop Ribbon's Blog to read her review.  So far it is the most versatile machine I have found, it cuts fabric, paper, heat transfer material, and vinyl.  I really hope it can cut through aluminum cans as well b/c I could create such wonderful decorations for my bedspring wreaths.  So cross your fingers for me everyone and lets hope I win it!

Friday, February 25, 2011

Happy Friday! Recycled Jar w/ Chalkboard Label and Upcoming Events!

TGIF!  This is the first weekend in a long time I haven't had something to do!  Unfortunately the BF has to work all weekend so I will be on my own.  I think I might try to re-organize my spare bedroom/shop b/c honestly there is no way anyone could possibly sleep in this room right now :).  I have already warned my little sister if she is coming to stay she needs to give me a weeks notice.   I totally destroy it every time I have a show to do, so I think its time for some organizing and hopefully a little creating as well.

What I have to share today is actually what I used to display my fabric/soda can/sheet music roses last weekend at the FFA Craft Sale.  I have been saving jars from food for awhile now and finally came up with a use for them that is rather easy, but cute.  Using the same idea as my upcycled mail holder I taped off a square section on to each jar, painted it with a layer of white paint and then several layers of chalkboard paint.  I then let it sit overnight and voila cute reusable jars.  


Upcoming Shows
I just recently joined the Holiday Shopping Kick-off Fair which is a travelling fair that visits a different town each month and includes some of your favorite vendors, such as Avon, Scentsy, Pampered Chef, Gold Canyon Candles and so many other great local vendors.   The next fair is Saturday, March 12th from 3 pm - 8 pm at the Massena American Legion.  Become a fan on Facebook to know when we will be in your town!

I also signed up for another craft sale to benefit the Canton Day Care Center.  This should be a rather large one b/c they have 4000 square feet for vendors to set up.   This show is Saturday, March 19th from 9 am - 3 pm at the Canton Day Care Center at 205 State Street Road in Canton.  There will also be several raffles to win items so check it out!


Thursday, February 24, 2011

Recycled Newspaper Origami Seed Starter Pot

As you may have noticed by yesterday's post I have a lot of planting to do!  Year's in the past I have just used the jiffy seed starting trays and while they do work well, I just don't like to buy them and I wish they were a little larger to let the roots get larger.  This year I started looking for a DIY version and stumbled upon etsy seller lovebybean's version and remembered a tutorial on Netflix Origami for a box.  If you have never been to Netflix Origami its a neat site to make things out of a Netflix wrapper, and it is actually where I first started to learn origami.  I took yesterday's newspaper out of the recycle bin at work and brought it home to make some seed starter pots of my own.

So you will need:

1. Newspaper
2. Hot Chocolate with Peppermint Marshmallows :) (Optional)

So working at my normal station of the coffee table trunk in the living room, I started by taking one page of the newspaper.


Fold the short site to the top to create a triange and then cut off the excess, leaving a square of newspaper. 


Follow the instructions on Netflix Origami for just the box, not the lid too (unless you want lids).  

The end result:  


Too bad I still have way too many to fold!  Once the seedlings are ready to be planted outside, just put the whole newspaper box in the ground and it will break down and leave nutrients in the soil for your flowers!  

Enjoy!

Thursday, February 10, 2011

Junk Picking - My Latest Finds & Chalkboard Mail Holder

Remember how I find the board for my Springs n' Things Sign, well I also found some other interesting objects.  My grandmother used to run an antique shop out of that section of the barn and I think these were some of the leftover items that have since gotten a little rusty and dirt!

Rusty Coffee Pot, Wall Holder, 3 Insulators (1 clear, 1 blue, 1 turquoise), Atlas Mason Jar, and a Rusty Grater, 2 old locks
I already love any kind of mason jar, they can be used for so many great things.  Check back for projects using the others!

 I decided to work with the wall holder first b/c I currently hate the box holding our mail and needed something smaller so I would be forced to clean it out sooner and it wouldn't get out of control.  To add a little pizazz I decided to create a chalkboard label using chalkboard paint of course.  I cleaned up the wall holder a bit and lightly sanded it to get a little of the rust off.  I then, using blue painter's tape, taped off the rectangle I wanted for the label.  I put a heavy quote of white paint on for my base layer and then 2 layers of chalkboard paint. 


I let that sit for an hour or so and then I removed the tape.  


It had to for at least 24 hours to cure before you can write on it, but here is the finished product: 


Not only can this be used in your house for mail but by having a changeable label it can be used at parties and weddings!


Tuesday, January 25, 2011

"Button, button who's got the button?" - Tweedle Dee, Alice in Wonderland - Cute Button Garland

For some reason, like springs, I really like the look of buttons.  I have some berry garland all around the top of my kitchen cabinets.  I was getting pretty sick of it, and wanted to by new but the stuff is just so expensive.  I thought about painting it and may paint some of it still, but it would take forever!  So instead I had a bunch of buttons I'd gotten from people over time and ordered some yellow buttons off of Etsy.  I then strung the buttons on silver floral wire to make the garland.  I just did different sizes and shades and even some white ones too.  I think it adds a touch of color and cuteness to the berry garland!


Friday, January 21, 2011

Upcycled Zipper Rosette - Brrrr it's going to be a cold weekend!

I haven't wanted to try these for so long!  I kept seeing flowers people made out of zippers and wanted to try my rosettes using a zipper.  The BF finally broke a zipper in his coat, so I ripped the old one out and took it to his grandma's to get replaced.  Check out the result!


The only difference from my original rosette tutorial is, i had to use a lot more hot glue to keep it together but I still thinks it neat, I'm going to make 2 more smaller ones out of the other half of the zipper and put them on a headband!

Thursday, January 20, 2011

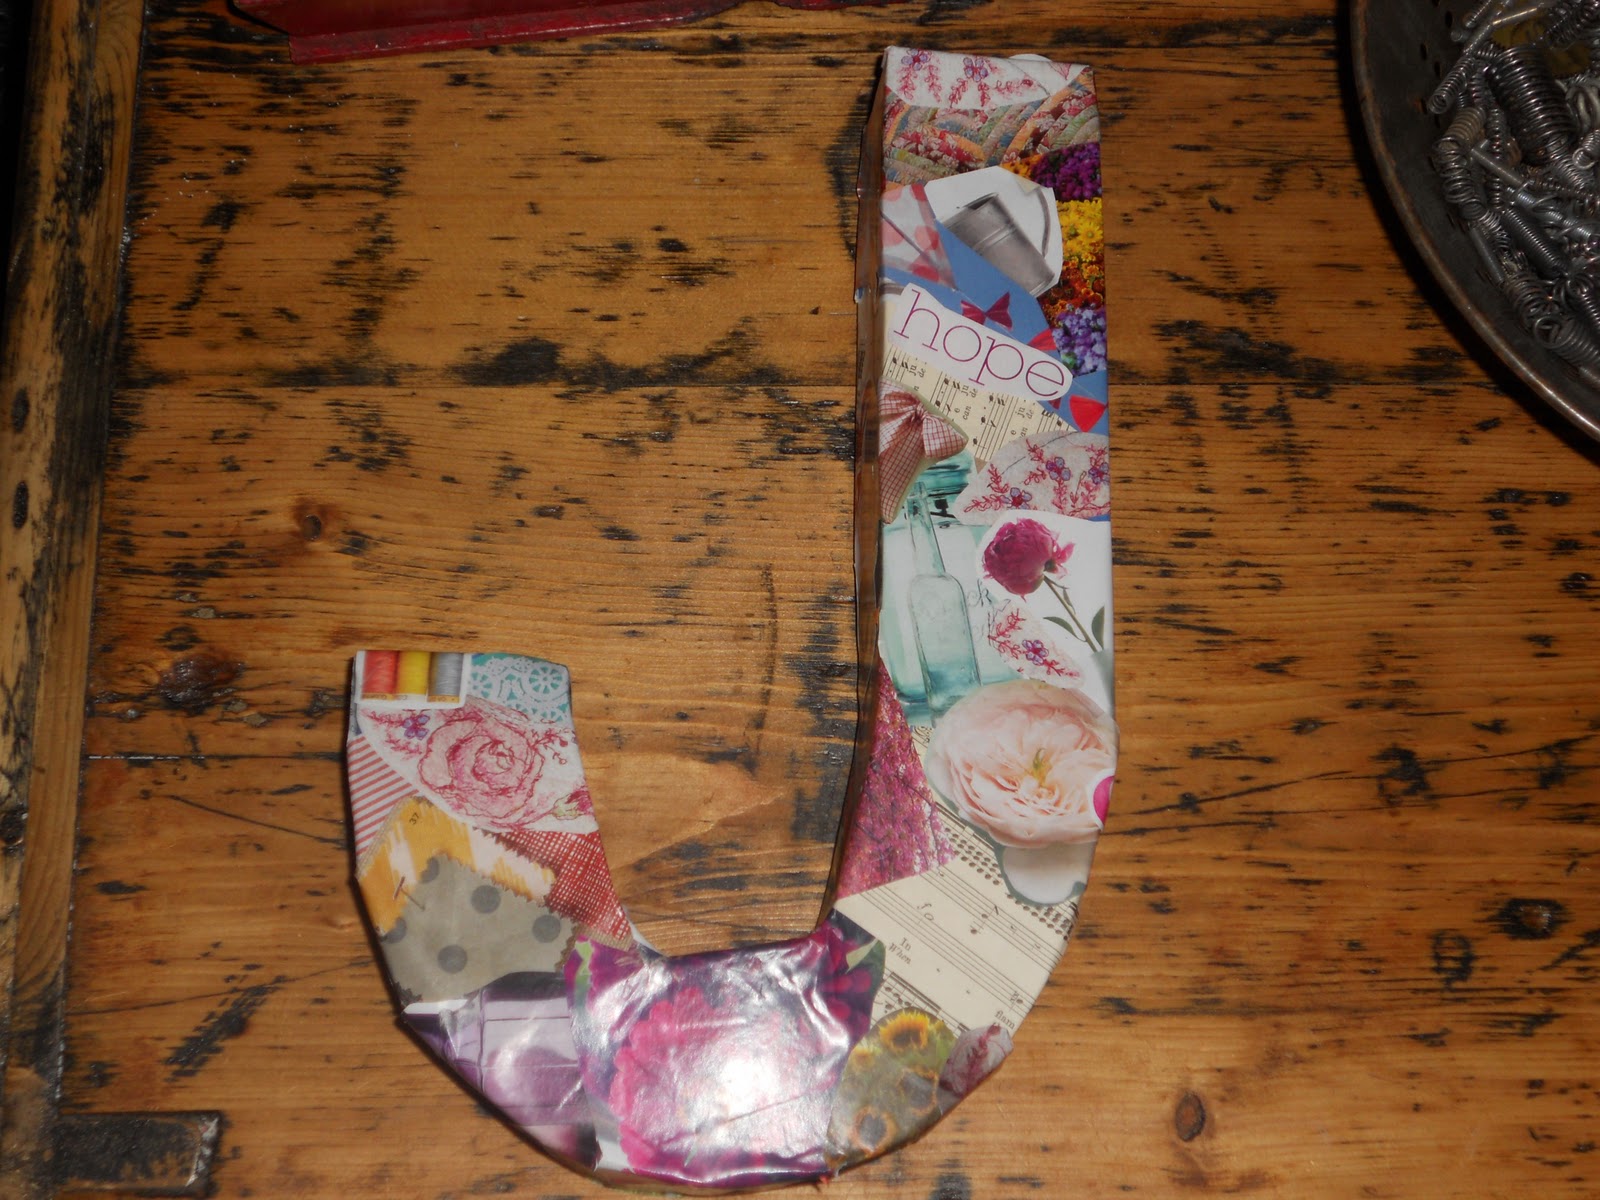
"J" is for Janessa

I needed some more decorations for my office at work so I decided to make a fun letter "J".


I think I managed to find everything I loved in Martha Stewart Living magazines :).  I was even able to find some of my china pattern in there as well.

So to create this letter, I made the actual letter shape out of cereal boxes and glued it together then added some masking tape for some extra strength.


To start decorating it, I used some vintage sheet music I had gotten as packaging for springs I purchased off of Etsy.  It was too pretty to throw out so I knew I would use it for a project.  For the rest of the images, I just sat down with a stack of Martha Stewart Living magazines and clipped out everything I thought was "me".  I used a glue stick to attach them b/c I didn't have any mod podge :(, but I plan on sealing it with mod podge.  


I think this would be a creative gift for a friend or even for in a kid's room.  Enjoy!