Friday, December 31, 2010

Sunflower Bedspring Wreath

Seeing as I was off from work for this whole week,  I found a lot of time to work on new bedspring creations. Today I sat down with my pile of springs, trying to make a clover (which is still in progress) but I ended up coming up with something I thought looked like a flower.


The "finished" Sunflower

While looking at the flower I decided to paint it like one of my favorite flowers, the Sunflower.  I used a stencil brush and dabbed both yellow and orange paint on it and then brown on the center.  It is not totally complete yet, but I figured I would still share it.  It will probably end up in my Etsy Shop!


Original Unpainted Version - made of 16 bedsprings


Let me know your thoughts!  Check back for other new bedspring creations!

Thursday, December 30, 2010

To Sell or Not to Sell: Bedspring Love & Heart ♥

My latest creation out of springs that were around the edge of a mattress, as well as some old fence wire, I created the word "Love" to go with the New Bedspring Heart.  Now the big question is do I post this for sale or keep it for myself.  I don't have many of that type of spring and not sure if there will be more b/c the first mattress I cut up didn't have them, but the second did.  So I may just be keeping this one for myself ;).

Wednesday, December 29, 2010

A Different Kind of Bedspring Wreath: The Snowflake Rag Wreath

Now that Christmas is over and all the decorations are put away.  I needed a "winter" wreath to hang on our front door.  I didn't want to just make another round wreath so instead I tied the springs together using scraps of snowflake material I had left from a project and also made a bow.  I think it's cute and different looking, and I still love springs!


Tuesday, December 28, 2010

My North Country Winter Hobbies - No. 1 Ice Fishing

When you live in the North Country, with our long (sometimes snowy, sometimes icey, sometimes brown)winter, you either have to learn to find hobbies to do to get you through the winter or be extremely bored.  I have plenty of indoor hobbies, but I am an outdoor person at heart so I go ice fishing with the BF.  Of course we rarely keep anything, only maybe some larger walleye or perch but it does get you out of the house for at least a morning and a little exercise since I run everytime I have a flag!  For those of you non-ice fishing people, each person gets 5 tip-ups that have a reel, a hook, a minnow and a flag, you setup each on in a hole and leave it until you get a bite and the flag comes up and you have to go pull it in and see if there is a fish on the other end!

The BF's checklist for a successful fishing trip with me:

1.  I fall down at least once - check
2.  I royally screw something up - check
3.  I get cold - check
4.  I want to go home - check
5.  Maybe and just maybe we catch some fish. - check

This trip was a success by completion of the checklist above.  I am a clutz, therefore me + ice = guaranteed fall. I got so excited when I actually had a flag that I pulled up the line and left it in a pile and it got a huge knot, the BF was not impressed, but he still got the knot out :).  After spending over $120 on some excellent cold gear and smartwool socks from Wear On Earth in Potsdam, NY and wearing new Columbia boots the BF got me for Christmas, rated for -65 F, my feet still got cold!  The rest of me was toasty in my new extreme weight Terramar  base layers, which will also be excellent for snowshoeing, outdoor skating and hiking!  Good luck with all your outdoor winter endeavors!  I will share other pictures of mine!

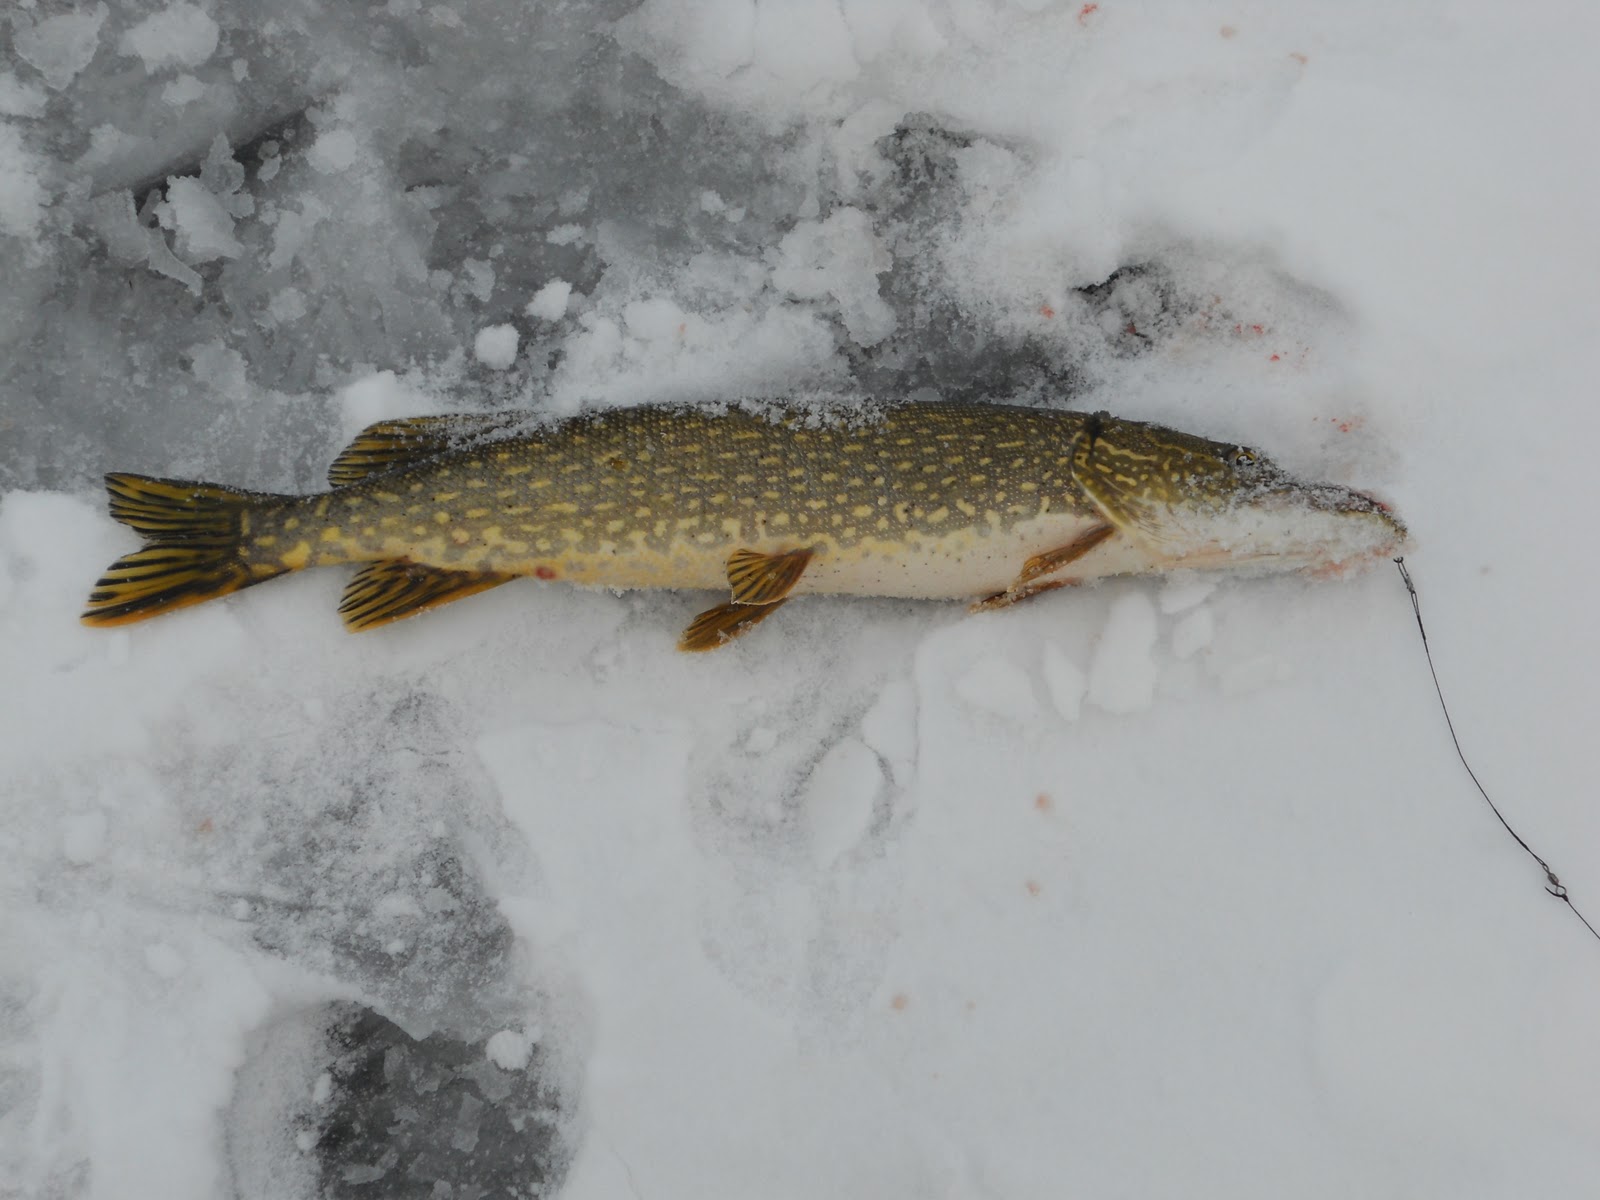
My First Northern Pike of 2010, the funniest part is I will hold or pull in one of these fish and try to run away at the same time, they are so ugly!!

Brandy Brook St Lawrence River Waddington, NY

Brandy Brook St Lawrence River Waddington, NY

My 2nd Pike

My 3rd Pike

Thursday, December 23, 2010

Be Extra Cheerful this Christmas with Disaronno & Eggnog :)

Last night I bought some eggnog and decided I needed a little bit of a drink with all the hustle and bustle of the holidays.  I was going through our liquor cabinet and found a full bottle of Disaronno and I figured amaretto and eggnog would be a good combo and it was delicious!

Italian Eggnog Martini-A Holiday Cocktail

There are several variations, you can make a martini buy adding Disaronno, Vodka to Eggnog as well.  Basically in an "on the rocks" size glass, but 1 shot of Disaronno, fill the rest with Eggnog (or an eggnog and milk combo) and then stir together.  I will definitely be making a pitcher of this for Christmas Eve!

Wednesday, December 22, 2010

♥ A New Bedspring Heart ♥

The mattress I cut up this weekend for springs, was a Sealy and the springs were slightly different than previous ones I had cut up, but it also included these long flexible springs around the outside of the mattress so of course I kept those too.  They will not hold their shape without other wire holding them, so I used a fuschia coated hanger, cut off the top and reshaped it into a heart, then coiled the spring around it.  It is not what I would call "complete" yet but I really like it and thought in a grouping they would be really cute wall decor, if they were all different sizes and maybe different colors??


I am going to try to make letters like this too!  Check back soon!


Tuesday, December 21, 2010

Sweet Potato Dog Bones - Bubba loves them!

I am fed up with buying rawhide, I am not sure why it costs $10 dollars or more for bones and now with 2 dogs it has gotten quite expensive and really isn't good for them, so I found a different option.  I was reading an article about how much dogs like sweet potatoes so I cut a whole sweet potato in half and then sliced it about 1/4 inch thick, placed the slices in one layer on a cookie sheet lined with parchment paper and baked them for 3 hours a 250 degrees and shut off the oven and left them in there over night.  The end result was a drier chewy slices.


Bubba went nuts for them and I didn't get to give one to Annie, but I will tonight.  They need to be refrigerated.  I bought 3 sweet potatoes for $2.47 and will probably get at least 30 treats from them, so much cheaper and healthier than rawhide!  Enjoy!

Monday, December 20, 2010

OnePrettyThing.com and the Leaning Tower of Springs

Since I am still mainly working on projects I cannot share b/c they are christmas presents.  I will share a really great website oneprettything.com that has daily posts of DIY projects for all holidays and even some kid-friendly projects.  The projects are really great!  When I get more time I would really like to go through the site and see all it has to offer.  If you are looking for a great project over Christmas break, check it out!


I was also running out of  bedsprings, so I cut up another mattress this weekend.  With no other place to store the springs they now occupy a trunk and are stacked in a tower in my spare bedroom, they are leaning a little and hopefully don't fall! Check back for more great spring projects, after the holidays!

Friday, December 17, 2010

Martha Stewart's Homemade Peppermint Marshmallows

If you tried my previous post on Martha Stewart's Homemade Marshmallows, these are even better.  They have a slight, not strong peppermint flavor that makes them delicious in hot chocolate.


These are becoming a Christmas tradition, I made these for the first time last year and gave them out to friends and family with packs of specialty hot chocolate and they were a hit.  A word of caution though last year I used peppermint flavoring for candy making not peppermint extract and they were very strong. So make sure you are using pure peppermint extract.  They are very easy to make, but can become a sticky mess as well so be careful.  

Recipe: http://www.marthastewart.com/recipe/peppermint-marshmallows

There is also another great recipe I may try for chocolate covered marshmallows if I have a chance before Christmas! Enjoy!

Thursday, December 16, 2010

Playing with Springs :)

I have cold, so I am not really creating anything to great until it eases up a bit, but I did work with some bedsprings last night and created several new round wreath sizes.

20 spring wreath - 25 inch diameter

6 spring wreath - 10 inch diameter

15 spring wreath - 20 inch diameter

Side View - 15 spring wreath - 20 inch diameter

The only hard part is once you get over 10 springs the wreaths start to lose their shape due to the weight and have to be individually coiled together, which is really rough on the hands (I have more than one cut on my fingers today) but the results are worth it!  It's sad when you have to get a tetanus shot just to do your crafts!

Tuesday, December 14, 2010

Snopes.com: Check it before you post it!

You know all those posts you see on Facebook or e-mail forwards, about so and so's kid went missing or the latest changing your profile picture to a cartoon was for pedophiles, well before you re-post or foward these e-mails check them out on www.snopes.com.  I know it never hurts to re-post some of these things b/c what if they are real, but it only takes a second to do a little research either instead of propagating a rumor.

snopes.com

Also if you are ever bored or interested in urban legends, this site has just about everything and many hours of reading entertainment!  Check it out!

Monday, December 13, 2010

My Vintage Mercury Glass Christmas

I love Mercury Glass.  It has a rustic but elegant quality.  This is the second year I have decorated our tree with vintage ornaments and beads. Some actually from both of my grandmothers as well as some I have purchased myself on Etsy.

Our Tree


My Favorite Bulb - not really sure why?
 Christmas themed soda boxes with chalkboard message blocks as well as mercury glass bulbs:


 My non-vintage mercury glass candle holder centerpiece:

Friday, December 10, 2010

Happy Weekend: Bedspring Art - Works in Progress

Last night while I was creating more bedspring wreaths, I made another heart, a small star and a regular round wreath.  I was trying to figure out a way to make them look more unique and more like art.  I like the plain or one color, but I also like simple things until I created these: 

Hand Painted Monarch Butterfly

Hand Painted Monarch Butterfly

Hand Painted Candy Cane Tea-light Holders
Both of these were trial runs to see if I would like the end result, I was pleasantly surprised and will continue to work to perfect hand painting these, as well as other pieces The only major problem right now is the paint I used was a little chunky and did not go on smooth, so I am going to look for new paint today and hopefully I will be more satisfied with the end result.   Watch for these items coming soon to my etsy shop!

On a side note, nothing makes you smile more than waking up to this on a Friday morning:

The view from my kitchen window

Even though it was a chilly 0 degrees this morning, I still smiled!  This is why I love Northern New York!

Thursday, December 9, 2010

Ice Luminaries - Only for those where its actually below freezing outside :)

I receive a e-newsletter from Country Living every week and one of last week's projects was ice luminaries.  I was supposed to post about this yesterday but they weren't frozen yet, which I'm not really sure how that happened I left them outside over night and dug them out of a snowbank and they weren't frozen so I stuck them in the freezer.  Considering the high in the next week is only in the 20s here, I have no fear of them melting.

The Finished Luminaries
The process is really easy, find a large plastic container preferably with a lid (if you can't find one with a lid its ok, its just easier with a lid)  I used drink mix buckets from Tastefully Simple, if you haven't tried there drink mixes they are all delicious and I recommend them.   Fill the plastic container 2/3's full with water and then slice up fruit, I used lemons, limes and oranges I also added some pine clippings off of our Christmas tree.   Next time I am going to use cranberries too.  But you can put just about anything in them.  Put your items in the water, and then place a clear cup (mine is greenish tint, its all we had) in the water, if you have a lid put the lid on to force the cup down if not use masking or duct tape to hold the cup in the center of the bucket.  Put in the freezer or outside overnight.  Check to make sure the ice is thoroughly frozen and place the bucket in the sink with hot water to loosen up the sides (it doesn't take very long).  Flip it over and pop the ice out .  Drop a votive candle in, light it and put them outside for a beautiful, traditional Christmas decoration!


If it starts to get warm you can always put it back in the bucket and place it in the freezer to save for later!

Tuesday, December 7, 2010

Taste of Home: Chicken & Broccoli Braid

Since I can't really share any of the projects I am working on since most of them are Christmas presents for people, I will share another of my favorite recipes.

Makeover Chicken 'n' Broccoli Braid Recipe

The Chicken & Broccoli Braid is actually a heart healthy recipe but still tastes delicious.  This is in our regular rotation of dinner meals, it tastes too good not to be bad for you!  I know using the yogurt in place of half of the mayo may seam a little odd, but you don't even taste it.  Give it a try! 

Check back tomorrow for Ice Bucket Luminaries!  They are outside freezing now as I type!

Monday, December 6, 2010

Upcycled Letterpress Drawer Jewelry Organizer

I found several of these in my travels on Etsy and already had a letterpress drawer at home that was not being used for anything so I decided to try it myself.  It is a really great way to store jewelry so you can see all of it.   I wanted to dress mine up a bit more than the ones on Etsy so I added rectangles of 2 different patterned letterpress paper in some of the spaces.


I used 2-sided tape to put the paper on b/c I didn't want to ruin the drawer by using glue.  To hang the jewelry I took really small nails and hammered them into the open spaces, some of the bigger spaces have 2 nails.  All in all i think it is a great piece for the bedroom if you have room on a wall and also allows you to see all the jewelry without having to dig through a jewelry box!  Happy Monday!

Friday, December 3, 2010

Laughing Cow Chicken Cordon Bleu

Just had to share this recipe, b/c it is healthy and still tastes delicious even the BF likes it and requests it. I believe I was first told about it by my boss and it is really easy and really delicious.

1. Preheat Oven to 400 degrees
2. Beat 2 skinless boneless chicken breasts
3. Spread 1 (2 for the BF haha) wedge of Laughing Cow Light Swiss on the flattened chicken
4. Add 1 - 3 pieces of ham
5. Roll up and hold with a toothpick if necessary
6. Place on foil-lined baking sheet and sprinkle with Italian style breadcrumbs (or plain work too)
7. Bake for 45 - 50 minutes at 400 degrees

I serve it with a little bit of homemade raspberry jam it just makes the flavor come out wonderfully.  All and all if you make it with a 4 oz chicken breast, 2 pieces of ham (I use Sara Lee Low Sodium) and 1 wedge of Laughing Cow Light it is about 200 calories, but so delicious.


Now I know I am probably preaching to a few already fans of laughing cow already, but if you have never had it, you definately need to try it.  It is good on apples and grapes and any other kind of fruit.  All kinds of it are delicious.  My favorite 100 calorie snack is 6 reduced fat wheat thins and one wedge of garlic and herb laughing cow.  Best healthy sandwich a 100 calorie Everything Wheat Bagel Thin, tomato slices and a wedge of garlic and herb laughing cow.  So if you haven't tried it, you definitely should!

Thursday, December 2, 2010

Book Review: "The Hunger Games" by Suzanne Collins

I know this is way off topic from my normal posts, but I just finished reading "The Hunger Games" 3-book series by Suzanne Collins and they are wonderful.  I strongly suggest you read them.  I had a hard time putting them down. Check it out on Amazon:

Amazon: The Hunger Games $8.99

Description from Amazon:  "In a not-too-distant future, the United States of America has collapsed, weakened by drought, fire, famine, and war, to be replaced by Panem, a country divided into the Capitol and 12 districts. Each year, two young representatives from each district are selected by lottery to participate in The Hunger Games. Part entertainment, part brutal intimidation of the subjugated districts, the televised games are broadcasted throughout Panem as the 24 participants are forced to eliminate their competitors, literally, with all citizens required to watch. When 16-year-old Katniss's young sister, Prim, is selected as the mining district's female representative, Katniss volunteers to take her place. She and her male counterpart, Peeta, the son of the town baker who seems to have all the fighting skills of a lump of bread dough, will be pitted against bigger, stronger representatives who have trained for this their whole lives. Collins's characters are completely realistic and sympathetic as they form alliances and friendships in the face of overwhelming odds; the plot is tense, dramatic, and engrossing."


If you liked "The Giver" by Lois Lowry, you will like these books! With a little searching I also found that this book will be coming to theatres in 2013, so read it before you watch it!  

Wednesday, December 1, 2010

Bubba's (AKA Mr. Bubbles AKA Bubba Gump) Christmas Tuxedo

While shopping at Wal-mart last week, I saw the cutest little christmas tuxedo for dogs, it was $10 and made from the cheapest fabric, so of course I thought, why don't I make one myself for Bubba!  That was last nights project.  


To make the bow, take a 10 in x 10 in piece of fabric (I used lovely green and red plaid), fold it over in thirds, and then sew the edge.  Adjust the tube so that seam you have just sewn is in the middle and then fold it in half and sew the end.  Adjust the smaller tube so that the seam is in the middle again, now you will have a small rectangle with no raw edges or seams showing on the front side.  Take a small strip of the same fabric about an inch wide, fold over the raw edges and sew to create the strip to hold the the bow down.  Wrap the finished strip around the rectangle of fabric to compress the middle to create the bow, make adjustments as needed.  Sew the strip of fabric in the back to hold the bow together, this needs to be as tight as possible so they bow won't shift.  Trim off an extra part of the strip.  Now for the "collar" portion, I used Bubba's current collar for the size and created a  finished 1/2 inch strip of fabric about 1 inch longer than his collar.  To attach the strip to the bow, I fed it throw the strip that was used to compress the bow.  To create the labels, I took two pieces of white fabric (size depends on how big your collar needs to be) and created them the same way I created the initial rectangle for the bow.  Then with a hot iron I folded over and pressed the rectangles for the lapels, then sewed it to the plaid collar strip and it was done.  I didn't have an velcro at home last night, so I had to tape it on Bubba last night.  Forgive me for the pictures, the hardest part about working with Bubba is getting him to hold still, the pictures aren't the greatest but you get the idea.  


I will try to take pictures again once I make Annie a Christmas outfit as well and of course hers will include ruffles!