Showing posts with label weddings. Show all posts

Wednesday, October 12, 2011

Wedding Wednesdays: Think Nature

This photo would make such a lovely background for engagment photos, maybe with just a few more leaves on the trees.  I took it last night of the road in front of our house.  Today's post is to get others to look at the natural beauty all around them when deciding how and when to do photos.  Now this road is beautiful at all times of the year, freshly fallen snow to the green leaves of spring, but nothing beats maple trees in the fall.  This wasn't even one of the best years for colors and they are still amazing   


I wanted to share some other great photo ideas from around  the web:
Pinned Image
From ordyandjoon.blogspot.com
Pinned Image
From forgetmeknotweddings.com


Pinned Image
After a fresh fallen snow, possibly a little freezing rain to coat the branches.

Wednesday, October 5, 2011

Wedding Wednesdays: Colorful Ruffled Crepe Paper Tutorial

I found a tutorial a long time ago on how to make this, but I couldn't find it again to link to so I made my own.  Ruffled crepe paper is a cheap and super easy decoration alternative.  I made a bunch of it last fall for the BF's Grandmas 80th birthday party and it was a hit.  It looks 10x nicer than plain crepe paper.  I wish I had taken photos of it from her party, but unfortunately as normal I forgot.


Step 1:  Choose your colors!  These could be your wedding colors or accent colors.  For this tutorial I chose lime green and fuschia.  You can also use three colors and just cut it into long strips and inter mix the three, a little more challenging but that is how I did the red, yellow and orange combo above.


Step 2: Get out your sewing machine! Using a basic straight stitch, layer your crepe paper one over top of the other.

\

Step 3: As you are sewing along, gently give the crepe paper a little push so that it folds a bit and sew over the fold.  This will leave a nice ruffle, kind of messy ruffle!


Step 4:  Keep sewing until you get your desired amount, it really isn't a labor intensive process just tedious!  If you know how long you need your streamers to be for decorating I would pre-measure and cut strips of the crepe paper to sew, just make sure you add a little extra to cover the ruffling.


There are so many uses for this beyond just streamers, it could be tied to chairs or laid on a table as a fun runner.  I have even used it to decorate gift packages!

Enjoy!

Wednesday, September 28, 2011

Wedding Wednesdays: Musical Love Banner

So last week I posted about how to make your own wood mounted stamps.  I finally got all my letters finished which I would say total in only took me about an hour to cut them all out.  I had all the blocks pre-cut and then i just had to stick them on.  They are working out great, check out what I made with them this week:


Stamped on triangles cut out of old sheet music.  It would be perfect at a rustic wedding!


Here are the stamps I used!  Only problem I've found is I need to make sure I am stamping on a flat level surface to get an even amount of ink on the stamp and then an even imprint on the paper.


For this banner, to make it a little heavier I cut out the same size triangles from a cereal box and glued them to the letters.  Using a whole punch, I punched holes evenly across the top through both the paper and cereal box layers and then threaded through a red gingham ribbon.  I got the entire roll of red gingham ribbon for 50 cents at the flea market


If you were planning on hanging this banner somewhere the back would show as well, you could easily cut sheet music out and put it on the back.  You could even re-stamp something on the back of it as well, so it would be 2 sided :).

Happy Stamping!

Wednesday, September 21, 2011

Wedding Wednesdays: Bridesmaid Gift Custom Charms

This would definitely make for a unique bridesmaid gift.  They could be used as wedding glass charms, necklaces, bracelets, key chains and what ever else you can come up with.  


I purchased the antique brass base and matching glass disc from the etsy shop Newbora.  I got 10 of the 10mm base (approx 1/2 in)  and 10 of the matching 10 mm glass for $10.  They by far had the cheapest price but it ships from China so it did take a little while to get to me.  So if you order don't be in a hurry to get them! There are multiple sizes and styles available including earrings!    The quality is great though and worth the wait!


For the letter, I used a "J" from the title of vintage piece of sheet music.  You could use just about anything, an old picture, a word from a book or dictionary.  So technically this counts as recycling in that way as well.
I used my Loctite Crafter's Glue, which so far has been permanent and dries crystal clear.  The best part is it takes about 24 hours to solidly cure, so you can adjust it.  I cut out a rectangular piece larger than the glass disc and put a dab of glue on it and placed it over the letter.  As the glue cures it gets clearer and clearer but you can still move it to make sure the letter is centered.
 

Once it is completely dry, cut around the glass disc with an exacto knife, put another dab of glue on the back of the letter and press it into the brass base and let dry!  I attached a little gem on a wire for extra decoration.  

Not up for making your own, check out one of my favorite shops founding on Etsy for great jewelry options!

bridesmaids monogram necklace package - vintage blues
Bridesmaid Monogram Necklace Package - founding - $192.00

My absolute favorite: 

Wednesday, August 24, 2011

Wedding Wednesdays: Recycled Phonebook Hydrangea Centerpieces

Last week I showed a tutorial on how to create flowers out of pages from the phonebook.  This week I have taken it a step further, by dying the pages first and then cutting the edges to give them a more ragged appearance and the look of hydrangea.

Of course, I had to create them in my favorite color scheme of red and light blue.  I think they look so realistic.


To dye them just fold them up accordion style, and soak them in a mixture of hot water and food coloring. I soaked the entire sheet in the food coloring mixture but you could do it half in one color and half in another. I then patted them dry with paper towels and let them dry a bit before peeling them apart and letting the individual sheets dry then follow the tutorial instructions but don't put a center on them!


Enjoy!

Wednesday, August 17, 2011

Wedding Wednesdays: Bridesmaid Yo-Yo Headband

Lately I have had kind of an obsession with head pieces!  Created from upholstery fabric samples, for a fun yet chic wedding this would be a lovely bridesmaid headband. 


This will be available for sale this weekend at the Massena Chamber Car, Truck and Motorcycle Show at Robert Moses State Park Picnic Area from 9 - 4!  Stop by and check it out!  So much cuter in person!


Wednesday, August 10, 2011

Wedding Wednesdays: Beautiful Recycled Vintage Hair Comb Set

Need I say more?


This pair of hair combs was created from salvaged vintage jewelry parts.   Pearls, aurora borealis crystals and lovely gold roses with white enameling!  A great statement piece instead of a veil!
Check back soon, there are more great combs to come!


Wednesday, August 3, 2011

Wedding Wednesdays: Make it Meaningful

When my Dad passed away this spring, in lieu of flowers my co-workers/friends got together and gave me a Potsdam Chamber of Commerce gift certificate b/c they knew I would do something wonderful to remember my Dad.  This past Monday the BF and I finally built the garden arbor that I used the gift certificate to buy the lumber for. 


My thoughts for this arbor is one day when the walkway is complete from the garage to the house we can put it over that and I would walk through it every day and remember my Dad.  
Another really good idea and part of the reason I built it, is someday we can get married under it and it would be a meaningful way to remember my Dad at the ceremony.   

So a big THANK YOU to my co-workers and to the BF for helping me build it and agreeing we could get married under it SOMEDAY!


Wednesday, July 27, 2011

Wedding Wednesdays: The beauty of simplicity

Wouldn't these make lovely centerpiece flowers at a rustic country wedding? 


The blue hydrangea is from my garden and the Queen Anne's Lace is from the field behind my house.  What a great way to not waste money on flowers!

Wednesday, July 20, 2011

Wedding Wednesdays: Custom Ordered Recycled Wedding Cuffs

This was my first order for custom cuff bracelets for part of the wedding party in a wedding this weekend.  The wedding colors are red and black featuring damask print.  The bracelets look amazing!  Besides the ribbon each cuff is 100% recycled.


These two are extra tiny ones made for the flower girls.  They include a button with elastic cord to make sure they will stay on their small wrists!

If anyone is interested in custom cuff bracelets for their upcoming wedding they make an excellent and unique bridesmaid gift!  If interested send an e-mail to themadrecycler@hotmail.com.  Pricing is $15-$20 per large cuff and $10 for small cuffs.  

Enjoy!

Wednesday, July 13, 2011

Wedding Wednesdays: Guest Blogger Not so Crafty Jessica - Inexpensive & Easy Bachelorette Party Sashes!

Hi all! A couple weeks ago, I told Janessa that I was tasked with planning a bachelorette party for a family member and I was looking for a cheap, yet nice alternative to purchasing those “Bride” and “Bridesmaid” sashes that are often times worn on such occasions – and that unfortunately can run you around $8 a piece. Janessa, not surprisingly, offered me some advice on what I could do to save a little money and make some sashes that were personal, classy and a big hit with the ladies.
 
Now, I consider myself to be as far from crafty and creative as they come. So, the moral of this blog story is that if I can do this, anyone can! The wedding colors are black, white and red, so I chose to use this as my color palette along with silver for a little bling. The idea was to make the bride stand out, so her sash was black with silver and red embellishments while everyone else wore white sashes with red and black embellishments.

The items I needed were: 
Wide white & black ribbon
Thin silver ribbon
Fabric glue
Red, white, & silver puff paint
A package of scrapbooking embellishments (jewels, sparkly swirls)
Pencil
Scissors
Flexible measuring tape

I needed to make 10 sashes - Bride, Mother of the Groom, Mother of the Bride, Bridesmaids (5) and Flower Girls (2). Don’t worry, we didn’t bring the flower girls to the party, they just really wanted a sash. 

1. Use the measuring tape to figure out that a safe size for the sashes would be 6 feet. If you have someone who will be wearing a sash but is over a size 14 bottom, you may want to make this a bit longer. Cut the sashes. 
2. Put one sash around yourself or someone else to figure out where exactly you’ll want any writing to begin and end on each side of the sash. Use a pencil to lightly mark these spots. 
3. Use the space you have to write out the words in pencil on the front of the sash, like BRIDESMAID. 
4. Trace over the letters in puff paint and set aside to dry. 


After I finished the front of all of the bridal party’s sashes, I worked on the bride’s sash. First, I used fabric glue to secure the thin silver ribbon on both the top and bottom of the sash. Next, I followed the same steps as with the other sashes with the writing. Then, I added the silver embellishments wherever I thought they might look nice. I made sure not to put any on the shoulder area because scrapbooking materials are often rigid, so they won’t naturally bend with the shoulder. 


Once I finished the front of all the sashes, I decided just to quickly write everyone’s names on the back of the sashes. You can put whatever you’d like on the backs. 

When I got to the party, everyone loved the sashes and said that they would definitely keep them because they were so personalized and a great way to remember what a fun night we had! And the best part is that for all of these sashes, I only spent $22 and I had a lot of material left, so I could have easily made 6-8 more. That’s under $2 a sash!

Like I said before, if I can do this, so can you! So happy sash-making!

A Big Thanks to Jessica for providing her tutorial on sash-making for this week's Wedding Wednesday!  Hopefully she will have more to share!


Wednesday, July 6, 2011

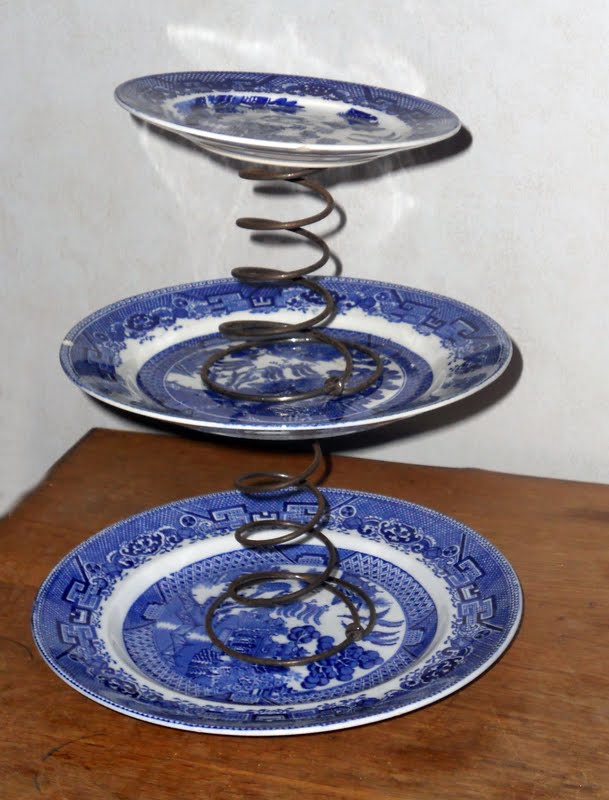
Wedding Wednesdays: A Springy Willow Blue Cupcake Holder

The blue willow china pattern will forever remind me of my grandmother and what a great way to incorporate your family's random china into your wedding!  The pieces I used below actually came from my grandmothers.  They do not match my kitchen and are not a full set, but I would love nothing more than to be able to use this when I get married!


Basically, it is a dinner plate, a salad plate and bread plate that have been glued to large springs.  I am still working on making it entirely level.  The best part is it still wobbles slightly so it gives it a whimsical feel!

Instead of using springs candle holders or wine glasses could also be used.  Be Creative! 


Wednesday, June 29, 2011

Wedding Wednesdays: Recycled Pink Rose Comb

Just lovely...need I say more?


Created from a pink soda can rose, a gold soda can lace mod podged butterfly and vintage jewelry bits.  Will be up for sale at my next show July 16th from 1 - 5 for Clarkson Alumni Reunion on the Cheel Lawn!

Wednesday, June 15, 2011

Wedding Wednesdays: Blue Recycled Soda Can Hydrangea Bouquet

The recycled bouquet: 


The inspiration from last week's Wedding Wednesdays: Red & Light Blue Wedding
Image #205450
Via Style Me Pretty
Elyse Hall Photography
Eventology Events
I wish I had had time to make it larger like the one above, but so far it is only 3 bunches of hydrangea, so it could work for a bridesmaids bouquet.  I think it is so lovely and double the size would be perfect!  Each petal is hand-cut and hand-painted so each one is unique!

Enjoy!


Wednesday, June 8, 2011

Wedding Wednesdays: I'm so in love with Red & Light Blue

I found this wedding about a week ago and probably already showed it to many of you but I am so in love with it.  The red and light blue color palette feels chic yet still fun.  Check it out!
Image #205450
Via Style Me Pretty
Elyse Hall Photography
Eventology Events
Image #205446
Via Style Me Pretty
Elyse Hall Photography
Eventology Events
Image #205430
Via Style Me Pretty
Elyse Hall Photography
Eventology Events
Check out the full wedding image gallery here!

Also a great red and light blue brooch bouquet on Etsy: 

Brooch Bouquet - The Carnival Bouquet
Brooch Bouquet: The Carnival by designmevintage

Wednesday, May 18, 2011

Wedding Wednesdays: Peppermint Pretty

For my wedding post this week, I have chosen Etsy seller Peppermint Pretty.  Peppermint Pretty specializes in custom vintage inspired wedding dresses, which are exactly my taste.  Check out some of my favorites:

Daisy Jane
Daisy Jane
Hello Dolly
Hello Dolly

Charlotte Sometimes
Charlotte Sometimes

Such great inspiration and a totally unqiue gown.  I have certain wedding gowns I love, but what I love is uniqueness.  I think thats what makes the day truly special is if your wedding is different from anyone else.

Peppermint Pretty was just last week a Featured Seller on Etsy, check out the story! 

Wednesday, May 11, 2011

Wedding Wednesdays: Fascinators

After watching brief portions of the royal wedding (all I cared about seeing was her dress and the amazing hats worn by the guests) I have since fallen in love with headpieces.  I am not sure I could ever pull one off, but it never hurts to dream right.  I am the maid of honor in a long-time friends wedding next June and her request was for everyone to wear hats!  Of course I will be making my own, so I need a little inspiration from Etsy, check out my findings:

Large Honeysuckle Fuschia Double Feather Flower Headpiece
Large Honeysuckle Fuschia Double Feather Flower Headpiece by CorrineONeill

Summer rose garden fascinator for Ascot or The Races
Summer rose garden fascinator by hapitat
**Sigh** I love birdcage veils, but for the bachelorette party....
Ruby red glitter mini burlesque crown
Ruby Red Glitter Mini Burlesque Crown by janinebasil
Fall in love with your own fascinators on Etsy!