Friday, July 29, 2011

Newspaper Yarn Pom Flowers

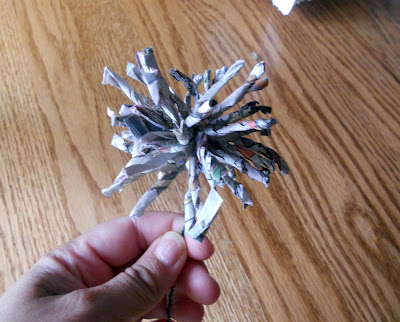
My latest recycled flower creation using the Newspaper Yarn  created in Monday's post.  

A mix of newspaper and t-shirt yarn flower poms


Pom's can be made out of basically anything and are very easy to create.  

1. Wrap the yarn around 4 of your fingers at least 10 times. (for a fuller flower wrap more)
2.  Take a piece of wire and put it over the yarn bunch in the middle of your fingers and twist to secure the bottom.  Remove your fingers and you should have an oval bunch secured with wire in the middle.   
3.  Take a pair of scissors and snip the loops at the end of the oval.  
4.  Pull and shape the pieces to create a round flower, you may also wish to trim up some of the pieces to make it neater.  :)

Next time I think I may try untwisting some of the yarn to give it more of a corkscrew feel. 

Check back next week for T-Shirt Yarn!

Stop by and checkout some of my creates at the NYPA Summer Spectacular Saturday, July 30th from 11 - 5pm at Hawkins Point Visitor Center!

Wednesday, July 27, 2011

Wedding Wednesdays: The beauty of simplicity

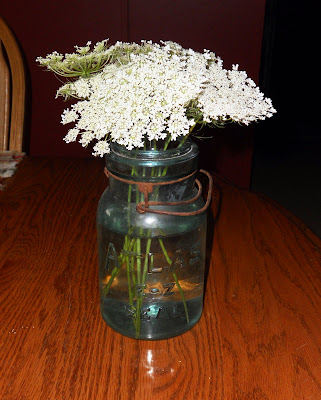
Wouldn't these make lovely centerpiece flowers at a rustic country wedding? 


The blue hydrangea is from my garden and the Queen Anne's Lace is from the field behind my house.  What a great way to not waste money on flowers!

Tuesday, July 26, 2011

Recycled Button Blossom Bobbi Pins

Another 99% Recycled craft.  All but the bobbi pin, thread and glue is recycled.  The fabric I used came from furniture upholstery samples that are normally just thrown out but I was lucky enough to have some given to me :).   The buttons are part of my ever growing collection.


Basically they are very simple to create.  The fabric portion is just a small yo-yo.  Making a yo-yo is very simple you cut out a circle of fabric (I traced the bottom of a glass) and do a running stitch about an 1/8th of an inch around the entire edge and then pull to gather.  I put a few extra stitches around the center to hold it down after I gather it, then I sew on the button and glue it to the bobbi pin.  Great for scrap fabric, old sheets, and even old clothes.

Enjoy!

Monday, July 25, 2011

How to make Newspaper Yarn!

Newspaper yarn is awesome and pretty easy to make if you have a little pit of patience.  I like using the funny pages and think they make the best yarn!


First of all, I was lucky enough to find an old wooden spindle that fit on my drop spindle so that I can just wind my "finished" yarn right to it, plus it gives the drop spindle a little more weight so it makes the newspaper spin tighter.  Basically you do the same as if you were going to spin roving.  Start by pinching the end of a 1 inch strip of newspaper so you can tie it to the top of the spindle.  Once it is securely attached start spinning and slowly letting sections of the newspaper twist, the tighter it twists the stronger it will be.  Once you are near the end of a strip of newspaper.   Take a piece of double-sided tape and attach another piece (overlap by about an inch).  I have found the tape really helps to secure the pieces to make spinning easier.  Keep spinning and when the spindle hits the floor, wrap your "yarn" around the spindle, reattach the top and keep going!


My crocheted newspaper yarn basket on my desk at work.  I get so many great compliments on it!


Friday, July 22, 2011

Words for the Weekend: A Quote to Share

I received this wonderful quote from a dear friend in my email this week and loved it so much I thought others would too, so decided to give it a little more pizzazz than the flat text email.  Enjoy!

99% Recycled Corkscrew Quote Ring

This ring is definitely rough, but it is the first of its kind so it was still a learning process.  Of course the text I used was from a vintage children's book that included several parts of Alice In Wonderland.  The base of the ring is from an aluminum Jack Daniel's bottle cute and wound into a corkscrew and lined with scrap black leather.  The quotes are on the ring "Curiouser and Curiouser" said Alice "DRINK ME" white rabbit "EAT ME".  Watch for more of these to appear in my shop and at my next show.  They are so fun to make and the next one will be cleaner I promise :).  


Happy Weekend Everyone!

Thursday, July 21, 2011

Flea Market Finds: My $1 Antique Bracelet


I bought this bracelet from a table at the Potsdam Summer Festival for only $1.  I had seen one similar before at an auction for over $30 and I really liked it anyways so I bought.  I did some research and found out it is a Pitman & Keller "American Queen" Sweetheart Bracelet from the Art Deco time period.  It has a small shield on it which I think I am going to go have my initials engraved in it.  Through my research I found another identical bracelet for sale and the price is.....


$48.00 on Etsy! 
Vintage Keeler and Pittman American Queen Sterling Base Sweetheart Expansion Bracelet
Vintage Keeler and Pittman American Queen Sterling Base Sweetheart Expansion Bracelet from etsy seller vintagepaige
What a great find!  Totally my best bargain yet!  Keep your eyes open there are good deals all around!

Anyways I just wanted to include a few shots of my flowers this year so far :)


Wednesday, July 20, 2011

Wedding Wednesdays: Custom Ordered Recycled Wedding Cuffs

This was my first order for custom cuff bracelets for part of the wedding party in a wedding this weekend.  The wedding colors are red and black featuring damask print.  The bracelets look amazing!  Besides the ribbon each cuff is 100% recycled.


These two are extra tiny ones made for the flower girls.  They include a button with elastic cord to make sure they will stay on their small wrists!

If anyone is interested in custom cuff bracelets for their upcoming wedding they make an excellent and unique bridesmaid gift!  If interested send an e-mail to themadrecycler@hotmail.com.  Pricing is $15-$20 per large cuff and $10 for small cuffs.  

Enjoy!

Tuesday, July 19, 2011

Upcycled Door Corner Display - Round 2

Sorry I took yesterday off from blogging to go with a good friend wedding dress shopping!

Anyways, I continued to work on my upcycled door corner display this weekend.  I ordered a brass door plate off of Etsy for $2.95 and got a porcelain door knob for $2.00 at North Country Neighbors. If you notice the door is actually upside down, but I think it adds to the fun!


Instead of using magnets, since I can't decide whether I want to paint it or not I am attaching the pictures and cards using sticky tack. I also got some antique bronze chain and attached some chandelier crystals, skeleton keys and an old brass lock I found at North Country Neighbors to hang over the knob.   I am thinking of doing some more projects with the chandelier crystals.


It's a great and easy way to display pictures!

Thursday, July 14, 2011

Recycled Book Pinwheel Wreath Decorations

The best neutral decoration I have made so far.  Made from the pages of an old book that I had already used the cover to make a clutch.  The pages are slightly yellowed with age and go perfectly with this wreath.  


Watch for these at my upcoming shows!  I hope to do several different variations as well as sheet music ones.

Stop by and check out all the new stuff this Saturday from 1pm - 5 pm at Clarkson's Alumni Reunion Taste of the North Country show on the Cheel Lawn.

Wednesday, July 13, 2011

Wedding Wednesdays: Guest Blogger Not so Crafty Jessica - Inexpensive & Easy Bachelorette Party Sashes!

Hi all! A couple weeks ago, I told Janessa that I was tasked with planning a bachelorette party for a family member and I was looking for a cheap, yet nice alternative to purchasing those “Bride” and “Bridesmaid” sashes that are often times worn on such occasions – and that unfortunately can run you around $8 a piece. Janessa, not surprisingly, offered me some advice on what I could do to save a little money and make some sashes that were personal, classy and a big hit with the ladies.
 
Now, I consider myself to be as far from crafty and creative as they come. So, the moral of this blog story is that if I can do this, anyone can! The wedding colors are black, white and red, so I chose to use this as my color palette along with silver for a little bling. The idea was to make the bride stand out, so her sash was black with silver and red embellishments while everyone else wore white sashes with red and black embellishments.

The items I needed were: 
Wide white & black ribbon
Thin silver ribbon
Fabric glue
Red, white, & silver puff paint
A package of scrapbooking embellishments (jewels, sparkly swirls)
Pencil
Scissors
Flexible measuring tape

I needed to make 10 sashes - Bride, Mother of the Groom, Mother of the Bride, Bridesmaids (5) and Flower Girls (2). Don’t worry, we didn’t bring the flower girls to the party, they just really wanted a sash. 

1. Use the measuring tape to figure out that a safe size for the sashes would be 6 feet. If you have someone who will be wearing a sash but is over a size 14 bottom, you may want to make this a bit longer. Cut the sashes. 
2. Put one sash around yourself or someone else to figure out where exactly you’ll want any writing to begin and end on each side of the sash. Use a pencil to lightly mark these spots. 
3. Use the space you have to write out the words in pencil on the front of the sash, like BRIDESMAID. 
4. Trace over the letters in puff paint and set aside to dry. 


After I finished the front of all of the bridal party’s sashes, I worked on the bride’s sash. First, I used fabric glue to secure the thin silver ribbon on both the top and bottom of the sash. Next, I followed the same steps as with the other sashes with the writing. Then, I added the silver embellishments wherever I thought they might look nice. I made sure not to put any on the shoulder area because scrapbooking materials are often rigid, so they won’t naturally bend with the shoulder. 


Once I finished the front of all the sashes, I decided just to quickly write everyone’s names on the back of the sashes. You can put whatever you’d like on the backs. 

When I got to the party, everyone loved the sashes and said that they would definitely keep them because they were so personalized and a great way to remember what a fun night we had! And the best part is that for all of these sashes, I only spent $22 and I had a lot of material left, so I could have easily made 6-8 more. That’s under $2 a sash!

Like I said before, if I can do this, so can you! So happy sash-making!

A Big Thanks to Jessica for providing her tutorial on sash-making for this week's Wedding Wednesday!  Hopefully she will have more to share!


Tuesday, July 12, 2011

Upcycled Door Corner Display

A friend of mine recently purchased a house and found this old door in it.  She was going to take it to the dump, but I told her I wanted it.  It is a solid pine door that was stained on one side.  It is beat up but for me that just adds character.  I have not totally committed as to what the final result of this will be but basically what I wanted was somewhere to display more pictures as we have limited wall space.  


So I cut the door in half myself.  Yes this was my first time using a power saw and I did great, not even remotely as scary as I thought it would be.  The BF gave me some basic safety instructions and helped me but I did it .  I definitely see more power tools in my future.  Anyways using the hinges the came with it, I reattached them using the existing screws to make the door fold into a 90 degree angle so it fits very nicely into the corner.   I took off the old door knob and I am going to replace it with an old porcelain one I found at the local flea market for $4.00 after I find a door plate for it.   


I haven't decided yet how I want to finish it.  My original thought was shelves but I am not so sure anymore.  Now I am kind of thinking making parts of it or the whole thing magnetic so I can just stick pictures and other things to it, that way it would be really easy to change.  I am not sure if I want to use recycled cookie sheets to make it magnetic or use magnetic primer and then paint it a color.

Please forgive the pile of dog toys and stuff in the bottom of this picture, my dogs are spoiled :)
Check back soon to see how I finished my door display.

Don't forget I will be at the Taste of the North Country Craft Show on Cheel Lawn at Clarkson University from 1 pm - 5pm for Alumni Weekend!

Monday, July 11, 2011

Recycled Butterfly Bracelet

Many of you have already seen this bracelet as I wore it Saturday.  Created using some elastic thread, buttons and butterfly punches from an Arizona Green Tea can.  It is very dainty and not sharp at all.  It is also reasonably fragile as if the butterflies get folded over they can get broken!  Watch for it or one like it at my next show July 16th from 1-5 on the Cheel Lawn! 


Friday, July 8, 2011

Happy Friday! Spinach, Tomato & Ricotta Stuffed Chicken and Bridesmaid Dress Redo

So Pinterest.com has been an awesome resource for recipes as well as inspiration!  Last night for dinner I made Spinach, Tomato and Ricotta stuffed chicken and it was delicious!


We had it with a nice tossed salad, with blue cheese vinaigrette dressing.  Get the recipe here!  The only thing I might do different next time is add more garlic and some sweet hot peppers.  But I think I say most recipes need more garlic!  Instead of stuffing the chicken next time I think I might pound the chicken thin and roll up the mixture inside of it instead.  For more great recipes, check out my Yummy board on Pinterest!

This weekend besides getting ready for all of my upcoming shows, I am starting to redo one of my bridesmaid dresses for an upcoming wedding.  I couldn't find a dress I want to wear for a July 23rd wedding and didn't figure I had time to completely make one.  I have had this dress hanging in my closet since the wedding, which I believe was 4 years ago.  It is a very pretty dress, but needs to be shortened and made a little more fun!  So here it is in the beginning.  


I hope everyone has a good weekend!

Thursday, July 7, 2011

Recycled Butterfly Bobbi Pins

Lovely little butterflies made from soda cans painted and/or mod podged with lace or vintage sheet music.  Just adorable...


These and many others like them will be for sale at my next show July 16th from 1pm - 5pm on the Clarkson Cheel Lawn.  Please watch for other upcoming shows as I have booked several in the next few months!

Wednesday, July 6, 2011

Wedding Wednesdays: A Springy Willow Blue Cupcake Holder

The blue willow china pattern will forever remind me of my grandmother and what a great way to incorporate your family's random china into your wedding!  The pieces I used below actually came from my grandmothers.  They do not match my kitchen and are not a full set, but I would love nothing more than to be able to use this when I get married!


Basically, it is a dinner plate, a salad plate and bread plate that have been glued to large springs.  I am still working on making it entirely level.  The best part is it still wobbles slightly so it gives it a whimsical feel!

Instead of using springs candle holders or wine glasses could also be used.  Be Creative! 


Tuesday, July 5, 2011

What a wonderful weekend...

I had such a great weekend I barely spent anytime creating anything new and definitely didn't have to time to blog about it!  I had my little sister all day Sunday and Monday.  We had a great but exhausting time!

Here is Bubba just chilling on the hammock!


Check back tomorrow for some new great stuff!

Friday, July 1, 2011

Happy Friday! Recycled Candy Box Pinwheels :)

No I didn't sit down and eat all this candy last week :).  These boxes have been collected over time b/c I new someday I would want them for something.  Pinwheels are really easy to make basically I cut two strips for the box and accordian folded them, glued the ends together to make it round then you just push it down and glue the center.  The center "button" was created using a Martha Stewart Button Punch. 

So colorful!

This was my first attempt from a Milk Duds box, and shows and error, the circle doesn't come out even if you don't cut your strips the same size!  
Sweet Tarts Box

Reese's Pieces

Dots

I think these would make excellent Halloween decorations for a Bedspring Wreath or even on stems as flowers!  If you are going to the movies save your boxes for me!

Happy Weekend!